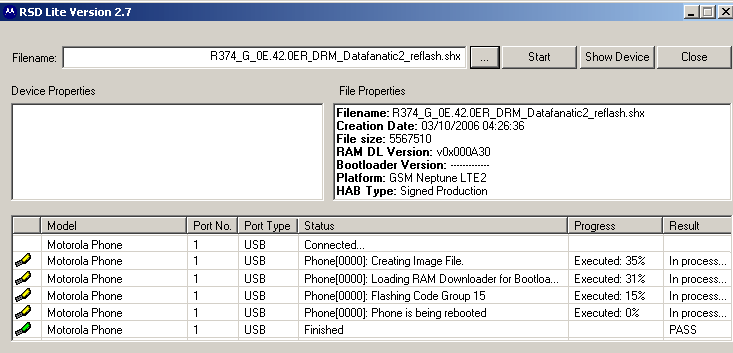
How to enable the hidden video cameraMost if not all V3s being sold today have the video camera recording capability activated. There was a time when we needed to add this functionality ourselves. These instructions are only for those of you that do not have a working video camera or would rather do this the hard way. You could simply find a current monster pack where this feature is already enabled in the programming.If you are a Cingular customer then do not use P2K Menu Editor to do this modification. It will corrupt the Cingular flex and key features like "MEdia Mall" "MEdia Net" and "My Account" won't work! Of course most people don't care about those "features" anyway... Currently, the easiest way to enable video recording is to use a monster pack by the name of, "R374_G_0E.41.C0R_ICEMAN_MOTOX.shx", this comes with flex version, "GSMV3xxCIN02NA0A5_VIDEO". Or find a more current monster pack. These can be found at the MotoX site. Otherwise, just follow the steps below if you'd rather do it manually. |
|
Launch P2K Phone File Manager and download seems "0032_0001" and "004a_0001".
Edit them in XVI32.
Seem "0032_0001" changes: Offset "6E" check bit "2" and bit "3". (enables Recording Sound and Video Length menu items). Offset "6F" check bit "7" (enables Video Quality menu selection). Offset "70" check bit "0" and bit "6" Offset "7D" check bit "7" (enables Resolution menu selection). Offset "7E" check bit "0" and bit "1" (enables zoom lens feature). Offset "7F" check bit "0" (enables the Size Limit field in MMS Message Setup) Offset "82" check bit "0"and bit "1" (enables brightness adjustment). There is talk of this video recording feature disabling ENS, which Cingular users need for seamless tower transitioning. Check offset "8B" to see if bit "4" is checked. If you are running a Cingular flex this shouldn't be an issue but you can check. You can save this seem now. Seem "004a_0001" changes: Offset "1D0" enter "01" into the two-digit box (sets High Resolution video as the default). Offset "1D1" to record in 3gp video format check bit "0", to record in mp4 video format uncheck bit "0". Offset "1D3" enter "01" into the two-digit box. Upload both seems. |
|
|
Next you have to edit the mma menu files to activate the "Video Camera" menu under
"Multimedia". If you are using a Cingular flex you must do the following:
Launch P2K Phone File Manager and go to the "/a/system" folder and download "mma_dcp" and "mma_ucp" to your computer. Since most people don't use "MotoMixer" anyway let's replace it with "VideoCamera". Launch XVI32. Edit both files you just downloaded. Find "MotoMixer". It is in the 200 address area. I found I needed to expand the window on XVI32 to get more line numbers to display on the left. Don't worry about overwriting one of the squares when you type in "VideoCamera". |

|
Now save this file and repeat the same steps for the other file. Save and
upload to phone.
The file "mma_ucp" had an attribute of "270000". This value can not be reassigned after uploading the edited file. This attribute comes from the initialization the phone goes through when the provider gets it from Motorola. The "mma_dcp" file had an attribute of "70004" originally but now has "7000", entering "4" in "Attributes" and pressing "Change" corrects it. Restart the phone. |


|
| Before and after swapping out MotoMixer for something more useful. |
|
This is how you set the limit to "None" for video recording (Cingular users): press the For T-Mobile users follow the above paragraph and follow this paragraph to remove the video recording limit: press the |

|
|
There it is, the panel for recording video. Note the zoom, darken and brighten buttons activated with the navigational control button on the keypad. Zoom only works before you start recording, not during a recording. |

As long as you have a video camera now, you could assign it to one of the menu keys. You can also change the resolution setting from your phone directly. Press the 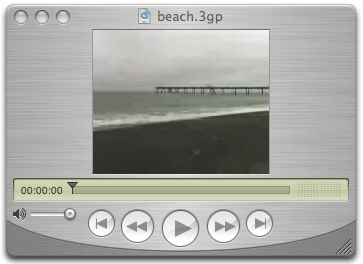
Want to see what a movie looks like that was recorded on the V3? Click the player above. I learned how to do this mod from a thread at the MotoX forums right here. |
Remapping the V3 keypad and Bluetooth headsetSince we didn't want our phones connecting to the Internet and being charged extra fees for this, I remapped two buttons on our keypads. We've hit these keys by mistake and I wanted to put and end to it. You can also use these steps to remap other keys not just the ones I'll do in this example of course. You can completely mess up your keyboard anyway you want to following these instructions.Launch P2K Menu Editor. Click the "Phone key mapping" tab at the bottom of the screen. Click "Open SEEM" then scroll down to "Open from phone". If you want to back up the seem you are editing first (which you already know you should do), then click on "Save SEEM" and scroll down to "Save as...". 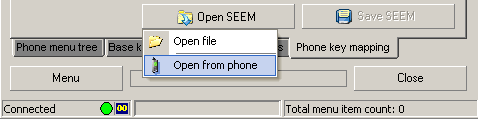
Go to the phone image and click on the key you want to remap to another function. In my case, I wanted the blue globe, officially known as the "left extended soft key" to be remapped to raise the volume. 
Due to a bug somewhere, I actually had to program it to lower the volume to get it to raise the volume in the program. Now go to the "Select new key value..." pull down menu and choose your new feature. 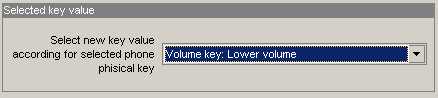
For the blue envelope button, I had to remap the opposite again to get it to lower the volume. Click on "Save SEEM" then scroll down to "Save to phone". Click on "Close" when you are all done. 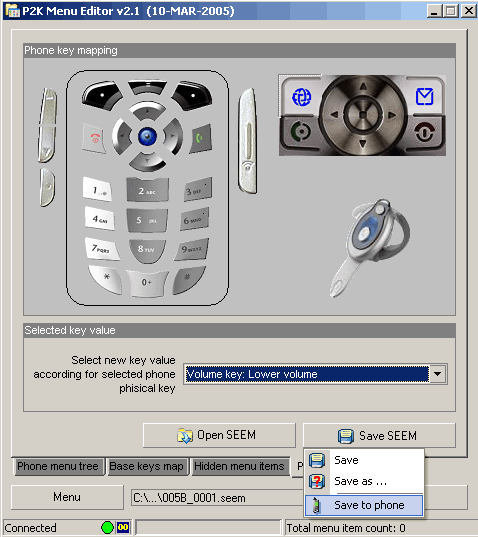
|
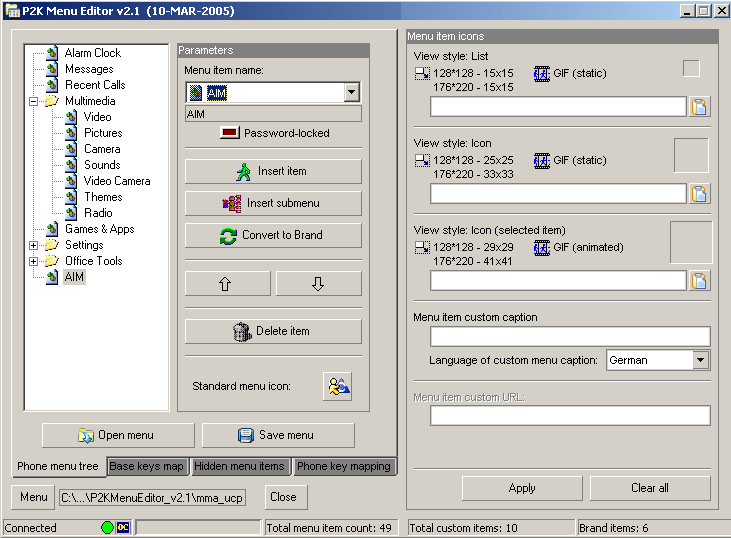
Adding, removing and rearranging iconic menu itemsI wasn't going to stop at just remapping a couple buttons to keep my phone from going online; there were other ways to get on the Internet. On the main menu there are three Cingular added features called: "MEdia Mall", "MEdia Net" and "My Account". These just had to go too.Launch P2K Menu Editor, you can download it here. Warning: once you delete these three menu items you will not be able to see your main menu in the standard 3x3 grid of icons. The menu will revert to list view with one of two solutions: add 3 icons (anything you want) back to the menu (it may still not work), or reload your original saved back up files and forget this modification. I chose to put "Address Book", "Calculator" and "Video Camera" into this menu. Just use the "Insert item" button to add new things and the up and down arrow keys to reorder your list. |
|
Click on the "Phone menu tree" tab toward the bottom of the screen. Click
on "Open menu" and then "Open from phone". Once it has loaded you might want to
back up this file that you are editing by clicking "Save menu" and then
scrolling down to "Save".
Once you've done that, go to the phone menu tree and choose whatever item you want to remove. "MEdia Net" is called "Browser" here. Click "Delete item", confirm your selection, click on "Save menu" and then "Save to phone". I next went to the "Settings", "Office Tools" directory and deleted "IM" and "Chat". Then I deleted the entire "WebAccess" directory. Disconnect your phone and verify the changes. If you notice there is a section over to the right where you can assign your own static and animated gifs to menu items. This is one of the fun programs to play with. Seen above are: the original menu with 9 items the way it comes from Cingular. What happens when there's less than 9 items (defaults to list view), and my new reordered menu with the new video camera icon. You can also rename your menu items. Not only would this change the name in the main menu, but it would change the text that gets assigned to the soft key too. To change a menu name click on the "Phone menu tree" tab. Then select the menu item you want to rename. You change the name in the "Menu item icons" section in the "Menu item custom caption" text box. Click the "Apply" button below when done and upload it to the phone. |
Modifying the operator, date and clock display location |
||
|
On the main screen of the V3, the operator you are using is displayed below the
signal strength meter with the date under it. The clock is in the lower
right corner. I wanted to remove the operator "Cingular" and
the date. You should be aware, if you remove the operator name you will
not see the names of any other carrier display should you change networks.
If you remove the date entirely you will not get confirmation of your battery
charging. Charging status will only show when turning on the phone and
then only briefly. These modifications can be done easily using P2K Phone
File Manager and MotoSkin. Download MotoSkin
here.
Make sure to backup your files before you attempt any modifications. That way if something goes wrong, you can always go back to the original settings. Launch P2K Phone File Manager. Look for the "Files" area and click "Update List". This will take a minute to read the directory structure of your phone and then you can navigate to the directory like you would your own computer. |
|
|
|
Go to the top left area where it says "V3 (/a)". Click the + next to the word "mobile" to expand the directory. Now click the + next to the word "skins". In my case I have only three skins: "Moto", "Scarlet" and "Silver". Click on "Moto" then go to the file window and CTRL click on all the files so they are highlighted. Then under the "Files" area click "Phone >>> PC". A screen will pop up and ask you where you want to save all the files. You might want to back these files up first then modify a second set on your computer. Repeat the process for "Scarlet" and "Silver". You will want to save these to separate folders. You also need to navigate to the "/a/mobile/mms/picture" folder on the phone and grab the wall papers for these three skins. This will help you to see what your modifications will look like before loading them back on to your phone. Once in the "picture" directory copy "Moto","Silver" and the "Passion".jpg" files to your computer. Put these individual files into their corresponding skin folders. I don't know why "Passion" isn't called "Scarlet" when it's wallpaper. Launch the MotoSkin program. Open the first ".ski" file you want to modify. MotoSkin will say it can't find the wallpaper so click the "..." button in the "Wallpaper" section to "browse image". Load the picture you downloaded. Now you can see what your phone's main screen will look like while you edit it. You may find it helpful to click "Options" and then select "Text rect". This will give you an outline of the area that the operator, clock or date will take up on screen. You should not attempt to put two items at the same Y1 and Y2 settings. The phone tends to act erratically. I find even when you align things correctly in the program, the phone displays something different when the files have been uploaded to it. I tried to have the date on the lower left and the time on the lower right the same distance from the bottom of the screen and even though my coordinates didn't overlap, it always caused problems. In fact I started tweaking the layout so much to get it just right that I completely locked up my phone to the point where the keypad wouldn't respond and the keypad light remained on constantly. I had to use the "57R_GSMV3xxCIN01NA065" flexlash file and then flex with "GSMV3xxCIN02NA088.hs" to get my phone to work. Then my greeting screen had a value stored that said "Flex Error: Phone Subsidy Locked". You get rid of this message by launching P2K Phone File Manager and deleting the file "secure_pds_init" in the "/a/mobile/system" folder. Then go back to the phone and personalize the greeting to say whatever you want and it will stay that way. Personally, I would either leave these three display items all on or all off. Not worth the headache to me. You could also go to the end of these instructions where I link to customized files that "MotoX" has already made, you may like one of these and not have to mess with this mod yourself. Remember, you'll have to repeat these steps for each skin that you want to modify. I will modify the "Scarlet" theme. 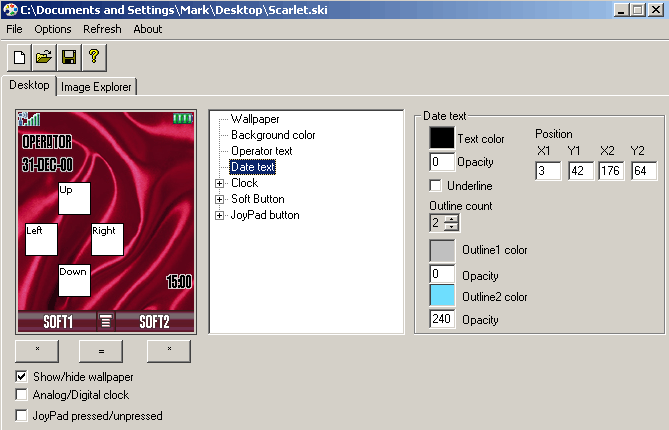
Click "Operator text" in the middle window. In the window beside that, change the value of "Opacity" to "255", "Outline count" to "0" and set "X1" to "3", "Y1" to "17", "X2" to "0" and "Y2" to "40". Some of your fields may already have these numbers in them. 
You'll see on the image that the operator's name is now gone. In my example, the date is already gone too. I took the screenshot after tweaking all three items. Your date will still show. Let's modify the date next. 
Click on "Date text" in the middle window. In the window beside that, change the value of "Opacity" to "255", "Outline count" to "0" and set "X1" to "3", "Y1" to "41", "X2" to "0" and "Y2" to "64". You'll see on your image that the date is now gone. I also tweaked my time, I felt it was too close to the edge of the screen. 
Click on the "Clock" check box to get to "Digital Clock" in the middle window. In the window beside that, change the value of "Opacity" to "255", "Outline count" to "2" and set "X1" to "107", "Y1" to "173", "X2" to "175" and "Y2" to "196". Next, save the ".ski" file, and upload it back to your phone using P2K Phone File Manager. You only need to upload ".ski" files, not the ".dat" files. Go to the "Attributes" box and enter "4" and then click on "Scarlet.ski" in the "File" window then press the "Change" button back in the attributes area (this actually sets the attribute to "70004" as you will see when doing a file update). This makes it a system file. Now in case you perform a "Master Clear" on your phone, this file won't be affected. In the "Phone control" area click "Restart phone". You can then disconnect your phone. Make sure to set your clock as "Digital" if you haven't already done so. If you mess up your ski files you can download the original sets right here. "MotoX" went through the trouble of making seven alternate layouts for the operator, date and time for the Moto specific skin. These are what they look like. If you want the files "MotoX" made, you must go to his site located here, scroll to the bottom for the files. 
I learned how to do this mod from a tutorial MotoX wrote right here. 
|
||
Installing other languagesFirst grab the language pack you want from one of these two links:Language packs, and more language packs. I can't tell you what the difference is between language packs using the same language on these two different pages. Once you have the file, flash it onto the phone. Don't be alarmed if the flash fails and your phone screen continues to display "SW Upgrade in progress..", just shut the phone off and turn it on again. Mine did the same thing when I tried a new language pack, but the new language was installed. When you do this, all the previous languages installed on your phone will be erased before the new language pack is installed. 
|
Installing themes/skinsP2K Commander is the best way to install skins. Launch the program and click on "Options". Then drag the slider bar underneath where it says "Number of files to load:" all the way to the right so it will read all the files on your phone. Then click "OK". I don't know why they make you do this, but when I first used the program I didn't do this and it would only read the first 75 files or so on my phone and because of this I could never find the directory that the skins had to go in.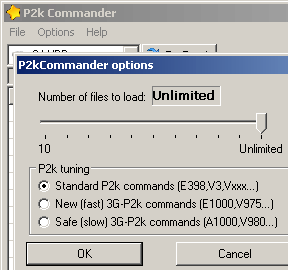
Look at the left side of the screen and go to the drop down box at the top and select the location where your skin files are at on your computer. 
Now find the specific folder that contains your skin files and double click it. 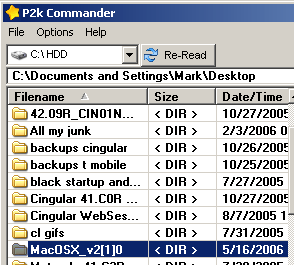
Look at the right side of the screen go to the drop down box at the top and select "P2k Mobile phone" from the selections. Navigate to the "/a/mobile/skins" folder. 
Click the button at the bottom right labeled "New Folder" and name this folder after the name of the ski file you will upload from the left side window. It must have the same spelling and the same capitalization. Click "OK" when you're done. 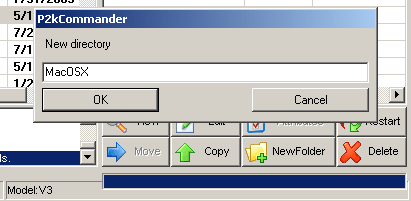
The folder name should appear automatically in the right side window, if it doesn't (it didn't for me), click on the "Re-Read" button next to the drop down box at the top right. 
Double click on the skins folder on the right hand side and repeat on the left hand side. 
Select all the files in the skins folder on the left and then click the "Copy" button on the lower right to transfer the files from the computer to the phone. 
Once again if the files don't automatically appear on the right side window click the "Re-Read" button to ensure they are there. 
If you have an "audio" or "picture" or "system" folder with the skin you are trying to upload, then repeat this process of copying those files into their corresponding file folders on the right hand side. You'll need to go up one level on the right side window to get back to the "/a/mobile" directory. Don't just upload all the files from "audio", "picture" and "system" folders into your skins folder, it won't work. When you are done copying your files click "Restart" on the lower right. Disconnect your phone from the data cable. To try out your new skin, press the |
Instant on power buttonHow would you like to not have to hold your power button for a few seconds to make your phone turn on? Well there's a simple seem edit that will fix this. Download seem "0032_0001". Then go to offset "2F" and at bit "7" check the box. If you'd rather have your phone take longer to turn on then uncheck this box.Remove the roaming iconDownload seem "0032_0001" go to offset "34" and uncheck bit "3".Remove the GPRS indicator iconDownload seem "0032_0001" go to offset "40" and uncheck bit "1". Then download seem "010a_0001" go to offset "00" and uncheck bit "1".Adding/removing hyphens from phone numbersDownload seem "004a_0001" and go to offset "80". Enter "01" in the box if you want to see phone numbers displayed like this: 1112223333. Enter "00" if you want to see phone numbers displayed like this: 111-222-3333.How to make the outer LCD illuminate continuouslyThis mod comes from this thread. This will add the option in your "Backlight" menu to select "Continuous" mode for your outer LCD screen while you are on a call. The continuous setting is not an all or nothing mod, you can always change your backlight mode through the phone menu directly.First download seem "0032_0001". Next download the Motorola Vxxx Mod Tool program here. Launch Motorola Vxxx Mod Tool and click the button labeled "0032_0001.seem" 
There's a lot of things you can change with this program, but for this mod you need to go to the "Initial Setup" area and check the box next to "Continuous Backlight". 
Then click "File" and select "Save seem file". 
Upload the seem to the phone and restart it. To get to the menu press the 
Before and after the mod. Enjoy your reduced battery life with this mod. This ends the "mods2" section of this tutorial. |