Downgrade iPhone 3G S 4.0 firmware to 3.1.3 firmware
Page 1 of 2So here I am running 4.0 firmware and the new 5.13.04 modem firmware on my iPhone 3G S. I personally like it, but I'm making this guide to help others out. Let's downgrade back to 3.1.3 firmware! Before you proceed, my iPhone meets some strict criteria: it's currently jailbroken, it has iBoot 359.3, the model number starts with MB, I have my ECID SHSH for 3.1.3 firmware on file, and I'm restoring to custom jailbroken 3.1.3 firmware created with PwnageTool.


Step 1.
Verify with Cydia that you have an ECID SHSH for 3.1.3 firmware. If you don't this guide is useless to you.
Step 2.
Go to Semaphore's site here. Then download TinyUmbrella 4.00.80 (or newer). This program is updated a lot! So I am hosting the exact same version I am writing about as I don't have the time to update this tutorial on a daily basis. You can download version 4.00.80 here.Next double click the .dmg file that was saved to your computer.

It is important that you drag the program icon into your Mac's Applications folder.

Launch the program. Enter your system password. Click OK.

This is what the program looks like.

Click the Advanced Options box.

Go to the ECID field. The number there must be converted to hexadecimal format. Copy and paste your number to this website. Go back to the ECID field in TinyUmbrella, erase what is there, enter eight zeros 00000000, then paste in your converted ECID number from the website after the zeros.
Go to the Device/Version drop down box and select iPhone3GS 3.1.3. Make sure the Location drop down box says Cydia, then click the Save My SHSH button.
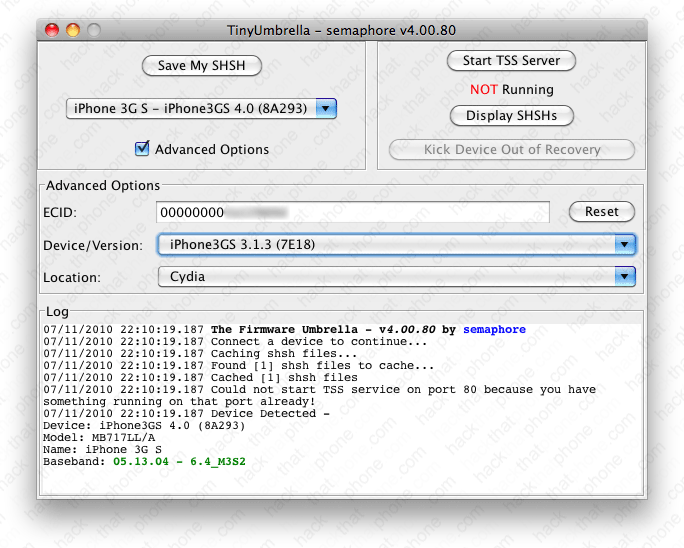
After a few seconds the program screen should update and inform you that it has cached shsh files.

Keep this program open, we will come back to it shortly.
Step 3.
Download PwnageTool 3.1.5 from the iPhone Dev Team's download link list here. You can also download the SHA1 verified file from me here.If you haven't already downloaded 3.1.3 firmware from Apple, then you can download it here. Note: Safari likes to open "safe" files by default. You must turn this feature off for this download to work correctly. Click "Safari", select "Preferences", from the "Geneal" tab uncheck the box that says "Open "safe" files after downloading". Otherwise just use Firefox to download this firmware file.
You should now have these two icons on your desktop. If your firmware file ends in .zip, then click on the firmware icon and remove the .zip extension from the file name. Confirm this change when you receive a pop up message warning.

Double click the PwnageTool_3.1.5.dmg. It will open the window seen below. Install PwnageTool. Make sure to drag the program icon from the disk image into your Applications folder! Do not attempt to run the program from the disk image window, it will cause problems. Since you are downgrading you may just want to place this application on your desktop and not overwrite a newer version.

Step 4.
Launch PwnageTool. Make sure the Expert mode button in the top left corner is selected. Click the iPhone on the right.
You should get a green check mark on the iPhone you selected. Click the blue arrow button in the lower right corner.

PwnageTool will search for the 3.1.3 firmware on your computer. When it displays the firmware file, click on it. Multiple firmwares may be displayed, so make sure you select the correct one. Then click the blue arrow in the lower right corner.

You will be at this screen and have many choices you can make. Click on General. Then click the blue arrow at the bottom.

At the General Settings screen, if you are using an authorized carrier, then do not check the box for Activate the phone. If you are not using an authorized carrier (i.e. you want to unlock), then check the box for Activate the phone.
Note: If you are interested in having push notifications working (and will not be using an official contract with your iPhone - i.e. you wan to unlock), you will need to activate your iPhone with an official AT&T SIM. This SIM does not need to be active. You could use the one that came with the iPhone, or some old AT&T SIM you find lying around somewhere. I used one I punched out from a free GoPhone SIM card that came with a complimentary $10 on it. Push does not work on hacktivated iPhones. So when using PwnageTool you will need to uncheck the activate Phone box.
You can also increase your root partition size to accommodate lots of Cydia applications and themes, et cetera. Click the blue arrow in the lower right corner when you have made your choice(s).

At the Bootneuter settings screen there is nothing to do. Click the blue arrow in the lower right corner.

Based on Saurik's advice (the creator of Cydia), I ignore the Cydia settings screen in PwnageTool. It is better to install any applications you need from Cydia directly. I've found problems when using this screen to automatically install programs. This does not mean that you can't install programs from this screen. Keep in mind if you add a lot of them you may need to increase your root partition size back at the general settings screen. Just click the blue arrow in the lower right corner, to continue to the next screen.

