Jailbreaking the iPhone 3G / 3G S on 4.1 firmware using redsn0w
Updated: November 1, 2010Page 1 of 2
Who is this guide for?
- iPhone 3G / 3G S
- I used iTunes 10.0.1
- I used OS X 10.6.4.
Thanks again go out to the iPhone Dev Team for providing this amazing, and FREE program for customizing the iPhone. You can visit their website here, and their blog here. You can read their notes regarding 4.1 firmware here.
Step 1.
Following this tutorial will prevent you from unlocking your iPhone, as the modem firmware (baseband) will be updated by following these instructions. This is a jailbreaking tutorial only.
Download 4.1 firmware for the iPhone 3G from Apple here:
http://appldnld.apple.com/iPhone4/061-7932.20100908.3fgt5/iPhone1,2_4.1_8B117_Restore.ipsw
Download 4.1 firmware for the iPhone 3G S from Apple here:
http://appldnld.apple.com/iPhone4/061-7938.20100908.F3rCk/iPhone2,1_4.1_8B117_Restore.ipsw
You should now have one of these icons on your desktop. If it ends in .zip, rename it to end in .ipsw. Note: Safari likes to open "safe" files by default. You must turn this feature off for this download to work correctly. Click "Safari", select "Preferences", from the "Geneal" tab uncheck the box that says "Open "safe" files after downloading". Otherwise just use Firefox to download this firmware file.

Plug in your iPhone to iTunes and press and hold the option key on your Mac, then click the restore button.

Navigate to your 4.1 firmware file on your computer. You are restoring to 4.1 firmware. You do not want to update as updating causes problems with flash storage space disappearing in jailbroken iPhones.


Various messages will appear while the iPhone is restored.

Note: If you did this without a SIM card in the iPhone then you will not be able to make phone calls with it. You will see this screen on the iPhone.

You will see a similar message in iTunes.

Note: If you did this with a SIM card like AT&T, AT&T GoPhone, H2O or O2 then you will be able to make phone calls as these SIMs will activate the iPhone after the restore has completed.

Step 2.
Download redsn0w 0.9.6b2 (or newer) from the iPhone Dev Team here. You should now have this icon on your desktop. Decompress it and a folder will appear.

Drag the redsn0w.app file into your Applications folder.

Step 3.
Launch redsn0w. Click the Browse button.
Navigate to where your 4.1 firmware file is, select it and click Open.


If you blink you will miss the lines of text that say: Processing firmware, and IPSW successfully identified. Click the Next button.

If you are using an iPhone 3G S you'll receive this prompt first. Make your selection then click the Next button.

A pop up will appear and display several messages quickly.

There are several options. Make your selections and click Next. Note: enabling multitasking on the 3G really slows it down. You can rerun the redsn0w jailbreak again if you want to change your options on this screen. Do not install Cydia over itself if you do this! If you select custom boot logo or customer recovery logo a file browser will open and you'll have to navigate to your pngs and select them.

Make sure your iPhone is off, and plugged into your computer with the USB cable. Click the Next button.

Instructions for entering DFU mode will appear. They start right away and go very quickly so try to keep up! First hold down the Power (sleep/wake) button for three seconds.


Keep holding on to the Power button, and press and hold the Home button for 10 seconds.
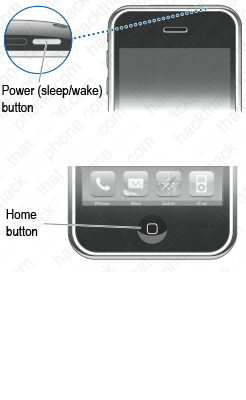

Continue holding the Home button, and release the Power button.